An under sink water filter is a commitment made for years and is easy to install. Because every household is unique, there isn’t a set approach to installment. But we’ve put together a guide to make it as hassle-free as possible for you. This guide shall streamline the entire process for installation. No need to waste your precious time if you follow the step-by-step process. Under the sink, water filter installations are as easy as they come. You can check out some of the best under sink water filters.
Mark the Location
Before you start cutting up any pipes or drilling holes in anything. You’ll want to be sure of where you’re placing your new under sink filter. You’ll need to nail down the specific place where your water filter will sit. As well as where you want the new faucet to come out. This is where the old “measure twice, cut one” adage comes in.
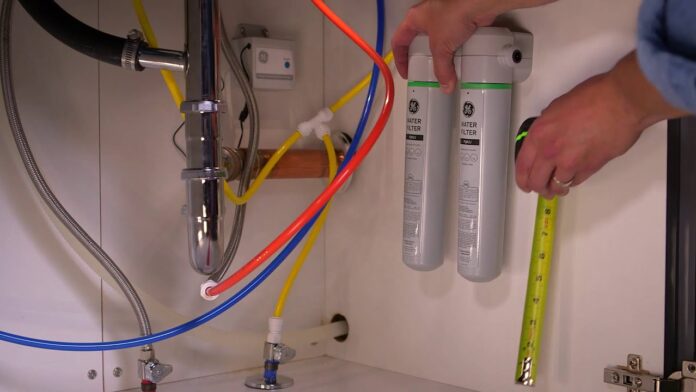
Place your water filter under the sink on the wall closest to the cold water line. Hold up the mounting bracket around the filter and mark where the screws will go. Then drive the screws in about halfway at the marks.
You’ll also want to decide where your new faucet is going to be located. If you have a soap dispenser or a spray nozzle you’re planning to get rid of, you may be able to use an existing hole. If not, determine where the new faucet will be, triple-check the location, and mark that spot on your sink.
Now that all the connections are back in place and your water filter is securely installed, it’s time to turn the water back on. You probably want to leave the faucet on for this to allow air to escape the line. While you’re letting the water run after installation is complete, triple-check every connection on the system.
5 Step Installment –
Remove the Tubing
Turn off the water at the cold-water shutoff valve underneath the sink.
Disconnect the water line from the shutoff valve by loosening the nut. Remove the tubing from the valve fitting. Use a basin wrench to loosen the nut holding the tubing on the faucet stem. Remove the tubing.
Mark the Location
Position your filter unit on the cabinet wall closest to the cold water line. Mark your location through the holes in the mounting bracket. At the marks, drive a couple of screws about halfway. The screws will be tightened completely after the filter is hung in place. Important: Leave enough clearance below the filter so you’ll be able to remove the canister and change cartridges easily.
Make the Plumbing Connections
With the location marked, you’re ready to make the plumbing connections. When connecting the filter, consider using flexible stainless-steel supply lines. Instead of the plastic tubing included in most kits. Flex lines thread onto the brass fittings and come in various lengths to match the job. They’re much sturdier than plastic tubing. Plus they are available at most home centers.
Hang the Filter
Hang the assembled filter unit on the wall and tighten the mounting screws until the unit is secure.
Connect the flex line that leads from the “in” fitting to the shutoff valve.
Make the Final Connections
Connect the flex line that leads from the “out” fitting to the threaded faucet stem. Then snug the plumbing connections. Slowly turn the water supply back on. Release any trapped air with the pressure-relief button.
Check for leaks. Congratulations! You now have a new under sink water filter system.
Happy Installing!


